

Dye transfer is one of those defects that doesn't give you a second chance. A stain you can re-clean. A missed button you can sew back on. But when a red lining bleeds onto a cream silk blouse in the same load, that garment is often gone — and so is the trust of the customer who handed it to you.
What makes it worse is that the garments that bleed don't look dangerous. They look fine sitting on your counter. The problem shows up two steps later, usually after the damage is already locked in by heat or solvent. By then you're not preventing a defect, you're figuring out what you owe someone.
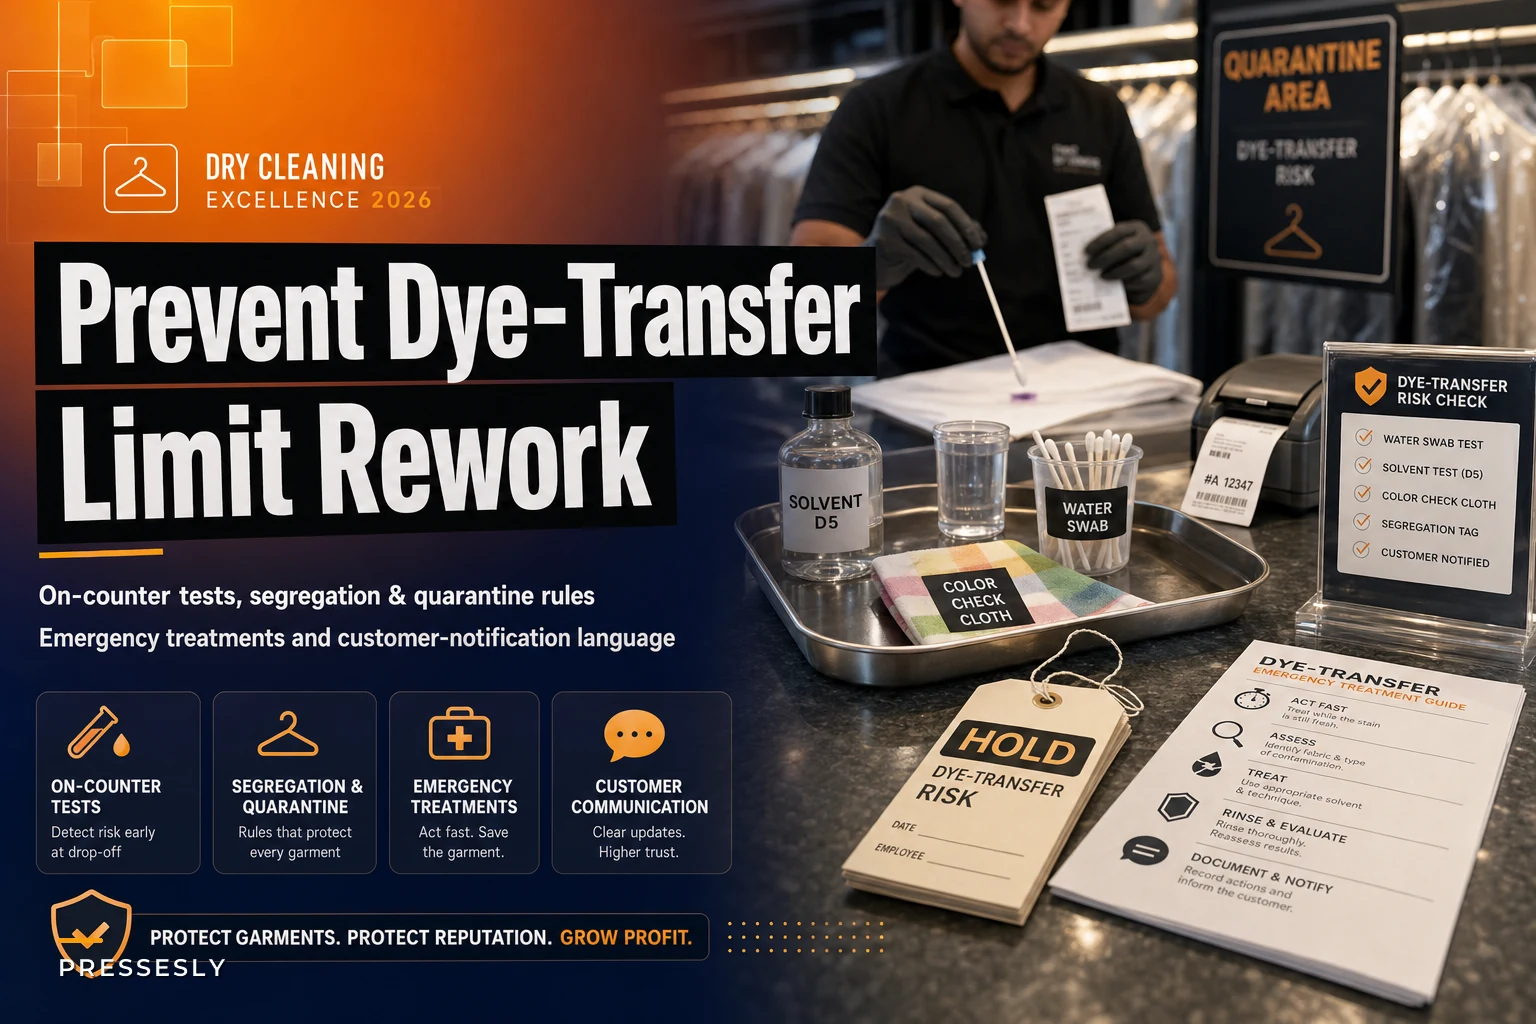
This post is narrow on purpose. It's about the moment a potentially unstable garment hits your counter, and everything you can do in the next 90 seconds — and the following hour — to stop it from taking down other pieces. On-counter testing, physical segregation, what to do when you catch a bleeder mid-process, and the notification language that keeps a scary conversation from turning into a payout.
Where dye transfer actually originates (and it's rarely the cleaning machine)
If you ask most owners where dye transfer comes from, they'll point at the machine. The machine is usually just the trigger. The risk was baked into the garment long before it arrived.
A typical scenario: a customer brings in a new pair of dark raw-denim jeans and a light-colored knit, both "a little dirty." The denim is uncured, over-dyed, and still shedding indigo. Nobody tested it. It goes into a wetcleaning load with three other items. The agitation, water temperature, and dwell time do exactly what they're supposed to — and the indigo migrates onto everything softer and lighter nearby.
-
New or inexpensive garments with reactive dyes that were never properly fixed at the factory.
-
Hand-dyed, batik, or ethnic textiles where the dye was never meant to survive commercial cleaning.
-
Red, deep blue, and black — the three colors responsible for the overwhelming majority of bleed incidents.
-
Previously home-treated garments, where a customer already soaked something in hot water and loosened the dye before you ever saw it.
-
Linings and trims that bleed onto the garment's own shell — the sneaky one, because there's no "other garment" to blame.
Dye transfer isn't a cleaning failure. It's an intake screening failure. The cleaning process just reveals what your counter missed. The fix lives at intake, not in the back.
The on-counter test: 90 seconds that saves a load
You don't need a lab. You need a white cotton swab, distilled water, a bottle of your working solvent, and the discipline to actually do the test instead of eyeballing it.
Never lose track of an order again.
Pressesly helps you manage, track, and communicate every garment order seamlessly.
- Unified order management
- Real-time customer notifications
- Staff scheduling & workload tracking
No credit card required
Here's the sequence that holds up on a busy counter without grinding the line to a halt:
-
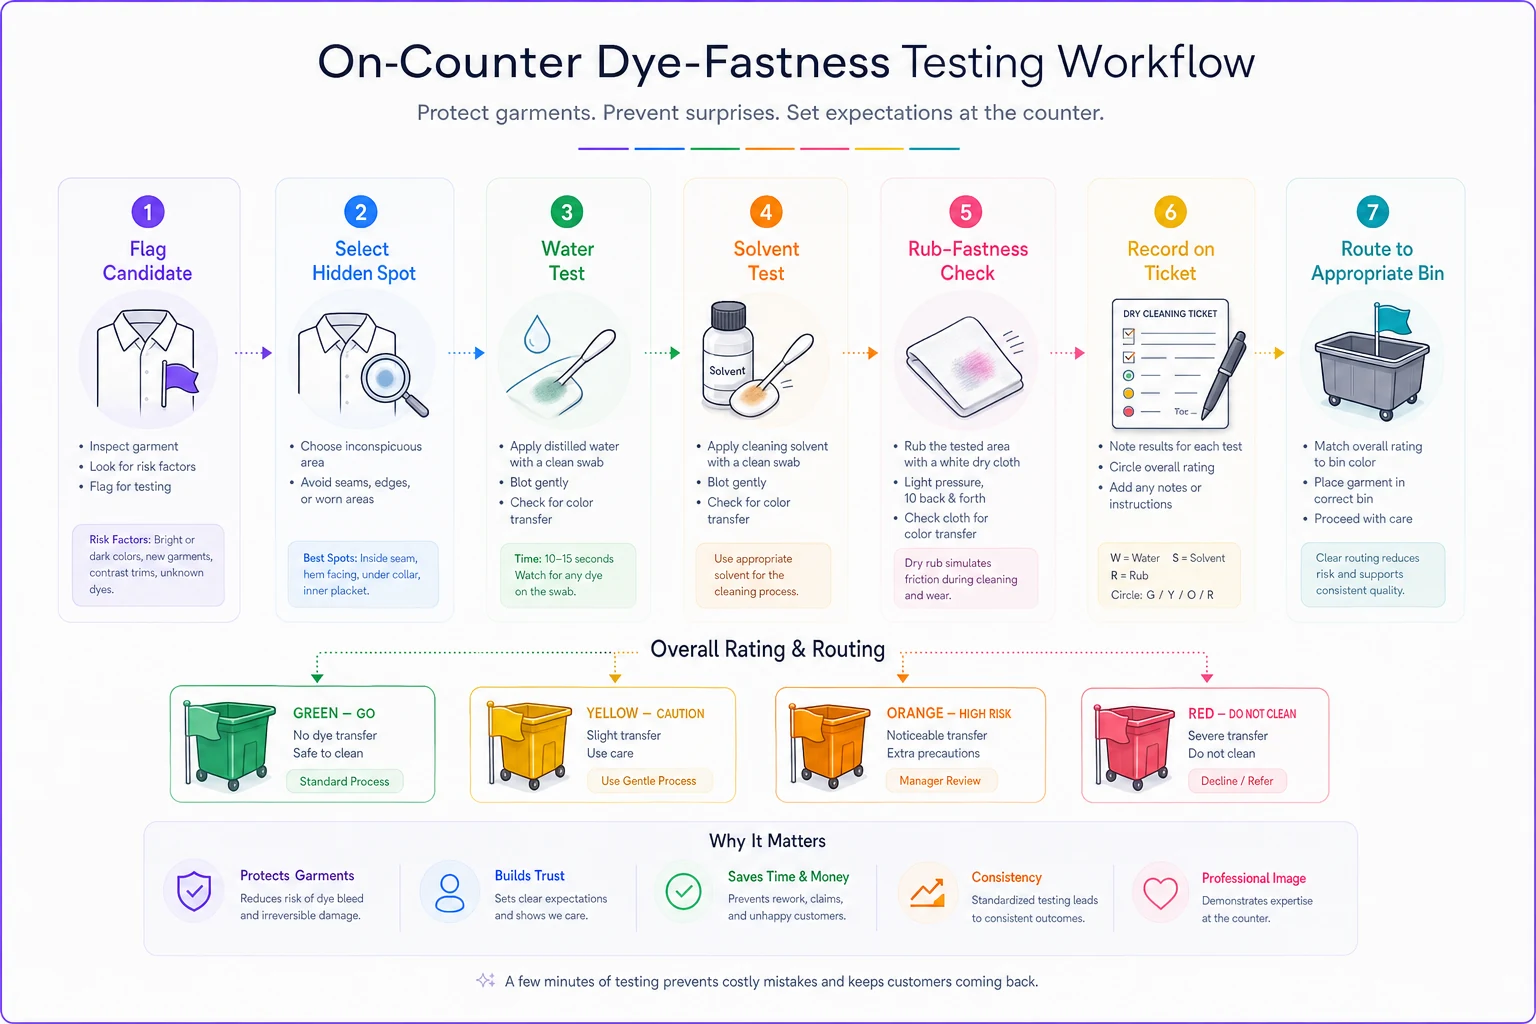
Flag the candidate. Any garment that's new-looking, hand-dyed, intensely colored, or where the customer mentions "it's never been cleaned" gets pulled for a quick check. You're not testing everything — just the risky 10–15%.
-
Pick a hidden spot. Inside seam allowance, hem fold, or under a collar. Never a visible panel.
-
Water test first. Dampen a white swab with room-temperature distilled water and press it against the hidden spot for about 10 seconds. Color on the swab means it's a wetclean risk.
-
Solvent test second. Repeat with a swab lightly dampened in your solvent on a different hidden spot. Color on the swab means it's a drycleaning risk too.
-
Rub-fastness check. Take a dry white swab and rub the test area briskly 8–10 times. Crocking — dry color rub-off — tells you the dye isn't even bonded well at rest. That's a serious red flag.
Record the result right on the ticket. A garment that passes gets a note. One that bleeds gets a colored flag and routes to a different handling path.
Here's a quick visual of the on-counter test and routing decisions.
One thing worth saying plainly: the test only tells you about the spot you tested. A garment can be colorfast at the hem and completely unstable at a contrast panel. With multi-colored or block-color garments, test each color block separately. A surprising number of claims trace back to "we tested the navy body but not the red piping."
This screening fits naturally alongside your broader intake checks. If you've already built out an intake stain assessment process with a decision tree and escalation thresholds, dye-fastness testing slots right in as another branch on that same tree — same counter, same ticket, same person.
Segregation rules that keep risk from spreading
Testing identifies the risk. Segregation contains it. The mistake most shops make is treating a flagged garment like a normal garment with a sticky note — it still ends up in the same cart, the same rack, the same load, because nobody built a physical separation into the floor.
A segregation scheme that holds up when the shop is slammed:
| Risk level | Test result | Handling rule |
|---|---|---|
| Green | No color on either swab, no crocking | Normal processing, standard load grouping |
| Yellow | Slight color on water swab only | Clean alone or with same-color darks; cool water; shortest viable cycle |
| Orange | Color on solvent swab, or moderate water bleed | Dryclean solo, no load partners; monitor first few minutes |
| Red | Heavy bleed or dry crocking | Do not process without customer sign-off; strong candidate for "clean at own risk" or decline |
The physical side matters as much as the chart. Flagged garments should never share a cart with light-colored items — even before cleaning, because a damp orange-risk garment can transfer onto a neighbor just sitting in a bin. Keep a dedicated bleeder bag or bin at intake. It feels like overkill right up until it saves a $400 gown.
Keep a dedicated bleeder bag or bin at intake. It feels like overkill right up until it saves a $400 gown.
The most expensive incidents almost never happen during cleaning. They happen in staging — garments pressed together on a loaded cart, waiting, with moisture and pressure doing slow, quiet transfer. Your segregation rule has to cover the waiting, not just the washing.
What to do when you catch a bleeder mid-process
Sometimes it gets past the counter. You open the machine or glance at a load and see pink where there should be white. Speed matters here, and the wrong first move makes it permanent.
The emergency sequence:
-
Stop and separate immediately. Pull the bleeding garment away from everything else the second you spot it. Every extra minute of contact moves more dye.
-
Do not apply heat. No pressing, no drying, no tumble. Heat sets migrated dye into fibers. A garment with transferred dye that hasn't been heat-set is recoverable far more often than one that has.
-
Keep the affected garments wet if the incident happened in wetcleaning. Dye still suspended in water is easier to flush than dye that's dried into place.
-
Flush, don't rub. Rinse transferred areas with cool water from the back of the fabric, pushing dye out the way it came in rather than grinding it deeper.
-
Assess for a dye-stripping or color-remover treatment on the contaminated garment — but only after testing that treatment on a hidden area of that specific garment first, because strippers can wreck the base color too.
Caught early with no heat applied, you'll often recover the receiving garment. Caught after pressing, your recovery rate drops hard and you're usually into claim territory.
Every incident — even one you recover from cleanly — should get photographed and logged. Before any corrective treatment, after separation, and after the attempted fix. This is the same evidence discipline that protects you at final inspection, and it's worth connecting your dye-incident log to the broader final-inspection photo standards and QC logs you already run, so there's one consistent record instead of scattered phone pictures.
The customer-notification language that limits claims
This is the part most shops get wrong, and it's the part that decides whether an incident costs you an apology or a check.
Set expectations before you clean, not after you cause damage. A customer who signed something acknowledging risk reacts completely differently than one hearing "risk" for the first time while looking at a ruined blouse.
> "This garment is showing some color instability in our quick test, which means there's a real chance the dye could run during cleaning. We can either clean it separately at your own risk, or you may prefer to leave it as-is. How would you like to proceed?"
Then capture the decision in writing on the ticket. Not a legal essay — just a simple initialed line: "Advised of dye-bleed risk, customer approved cleaning at own risk." That single sentence resolves a surprising number of disputes before they start.
> "During cleaning, one of your garments experienced unexpected dye transfer. We stopped the process immediately and began treatment. I want to walk you through exactly what happened and what our options are."
A checklist for the notification itself:
-
Contact the customer the same day the incident is discovered, not at pickup.
-
State clearly what happened, in one plain sentence.
-
Confirm what you did immediately (stopped, separated, treated).
-
Present realistic options rather than a single guaranteed outcome.
-
Reference the signed risk acknowledgment if one exists — gently, not combatively.
-
Document the entire conversation and outcome on the ticket.
No blaming the customer, no technical jargon, and — importantly — no premature promise to "make it like new." Overpromising a full recovery and then falling short is how a $60 incident becomes a $300 claim plus a lost customer.
A real scenario
A single-location shop doing roughly 320–360 orders a week kept eating two or three dye-transfer claims a month, mostly in the $80–$250 range per incident, with the occasional gown pushing past $400. Counter staff were "checking" garments by eye — which in practice meant not checking at all.
They introduced the 90-second swab test for flagged garments, a dedicated orange/red bin at intake, and the at-own-risk sign-off line on the ticket. Nothing sophisticated — a jar of swabs and a laminated handling chart taped behind the counter.
Over the following few months, caught-at-intake bleeders went from essentially zero to a handful every week, meaning those risks never entered a load. Paid claims dropped to roughly one a month, and the remaining ones were smaller because garments were caught before heat-setting. The owner's rough estimate was somewhere around $2k–$3k in avoided claims and rework over a quarter — most of it coming from the signed acknowledgment line turning "your fault" arguments into "we warned you" conversations.
The qualitative shift mattered more than the numbers. Staff stopped dreading the dark-red-garment customers because they finally had a script and a bin instead of a gamble.
When strict testing isn't worth it — and when it absolutely is
Not every garment needs the full treatment, and pretending otherwise just clogs your counter.
When this makes sense: new-looking garments, intense reds/blues/blacks, hand-dyed or imported textiles, anything the customer flags as "never cleaned," and high-value pieces where a mistake is expensive. Test these every time, no exceptions.
When it's overkill: well-worn, previously-cleaned garments in muted colors from repeat customers with a known history. You don't need to swab a gray business suit that's been through your shop a dozen times.
Who should not skip this: any shop handling formalwear, bridal, or significant wetcleaning volume. Those are exactly the categories where a single bleed incident wipes out the margin on a week of normal orders.
The judgment call is really about triage. You're not testing everything — you're building a fast habit of spotting the risky minority and routing it to a safer path.
Closing thought
Dye transfer feels like bad luck, but it almost never is. The garment told you it was going to bleed — on the swab, at the hem, in the way the dye crocked off dry. The incidents that become claims are the ones where nobody asked the garment the question before putting it in the machine.
Build the 90-second test into your counter habit. Give flagged garments their own bin and their own cleaning path. Get the risk acknowledgment in writing before you clean, and keep your notification language honest and fast when something slips through. None of it is expensive. All of it is cheaper than the gown you can't fix and the customer who won't come back.
Ready to elevate your dry cleaning operations?
Join hundreds of dry cleaners using Pressesly to save time, reduce errors, and enhance customer satisfaction.