



Most lost-garment disputes don't start at the rack. They start in the first ninety seconds at the counter, when a rushed intake skips the one detail that would have proven the customer brought in three pieces, not two. Everything downstream — the tag, the processing route, the partial pickup, the final signoff — is just a chance to either lock in that first record or quietly break it.
This brief is built around a single-location shop with one or two people at the counter during peak, a back operation of maybe three to five, and the usual mess of same-day rushes, partial pickups, and customers who swear they left a belt that nobody remembers seeing. The goal isn't a perfect system. It's a chain of small, boring confirmations that make the common failures nearly impossible.
The failure pattern you're actually fighting
Lost-garment claims almost never come from a garment that vanished into thin air. In real operations, the piece is usually sitting on a rack under the wrong order number, or it was handed to the wrong customer during a partial pickup, or it never got logged at intake because the counter person was juggling three tickets and a phone call.
A typical example looks like this: a customer drops off five shirts and a sport coat. The counter person tags the shirts as a bundle, gets interrupted, and the coat goes on the counter behind the register. Twenty minutes later it gets hung on the "to-process" rack without a tag. Now there's a garment in your shop with no ticket, no owner, and no record it ever existed. When the customer comes back asking for the coat, you have nothing. That's not a theft problem. That's a confirmation-gap problem.
The fix is to make every garment pass through a point where its existence is confirmed out loud and on paper before it leaves the counter. Everything in this brief exists to close one of those gaps.
Stage 1: Front-counter intake
Intake is where you either build an airtight record or create a future dispute. The counter person's job is to count, confirm, tag, and hand over a receipt that matches reality — in that order, every time.
Never lose track of an order again.
Pressesly helps you manage, track, and communicate every garment order seamlessly.
- Unified order management
- Real-time customer notifications
- Staff scheduling & workload tracking
No credit card required
The intake script (say it out loud)
> "Okay, I've got three dress shirts, one wool blazer, and a pair of slacks — five pieces total. The blazer has a stain on the right cuff, I'm noting it. Anything else in the bag? Great. Ready Thursday after 4. Your total's $31.50. Here's your receipt — hang onto that, it's what I pull your order with."
-
State the count by type ("three shirts, one blazer, one slacks")
-
State the total piece count ("five pieces")
-
Name any visible defect or stain before the customer does
-
Ask the closeout question ("anything else in the bag?")
-
Give the ready date and total
-
Hand the receipt and say what it's for
That fourth line — calling out the stain yourself — is what keeps you off the hook for pre-existing damage. If you spot a frayed lining or a missing button and say it at the counter, it goes on the ticket as intake condition, not your fault. For anything beyond a quick verbal note, photograph it. The discipline around angles, filenames, and retention is laid out in the intake-to-claims photo protocol, and it's worth building into the counter routine for any garment over a certain value.
Photograph high-value garments with noticeable defects at intake and save the image filename with the ticket.
Printable receipt layout
-------------------------------------------- [SHOP NAME] • (phone) 123 Main St • Order # 4821 -------------------------------------------- Customer: J. Alvarez Phone: ...5567 Dropped: Tue 10/14 2:41p READY: Thu 10/16 after 4:00p -------------------------------------------- QTY ITEM NOTES 3 Dress shirt launder, light starch 1 Wool blazer DRY CLEAN - stain R cuff 1 Slacks press -------------------------------------------- TOTAL PIECES: 5 TOTAL: $31.50 -------------------------------------------- Partial pickups noted on back. Unclaimed after 90 days per posted policy. Keep this receipt to collect your order. --------------------------------------------
Two things that aren't optional: TOTAL PIECES in bold, and a line reserved for partial-pickup notes. The piece count is what you reconcile against. The partial-pickup line is where you'll track split orders later, and it needs to exist on the physical receipt — not just in the system.
Stage 2: Tagging — content, placement, and the low-cost version
A garment with a good tag is a garment that can't get lost. A garment with a half-attached tag, or a tag pinned to the plastic instead of the piece, is a future problem.
What goes on the tag
| Tag field | Why it's there |
|---|---|
| Order # | Links the piece to the ticket and the customer |
| Piece # (e.g., 3 of 5) | Makes a missing garment instantly visible at pickup |
| Date in | Drives the aging and unclaimed-item clock |
| Service code | Tells the back exactly what route the piece takes |
| Defect flag | A single mark (★ or D) that says "check the ticket notes" |
That piece number out of total field does a lot of quiet work. When a tag reads "4 of 5" and only four tags come off the rack at pickup, your counter person knows a piece is missing before the customer leaves — not three days later on the phone.
Placement standards
-
Shirts/blouses tag through the inside collar seam or care-label loop
-
Pants/slacks tag through the waistband belt loop, back-left
-
Jackets/coats tag through the inside hanging loop, never the lapel
-
Dresses tag through the care label at the side seam
Standardizing placement isn't about aesthetics — it's about speed at assembly. When every jacket tag is in the same spot, the person assembling orders can verify a five-piece order in seconds instead of flipping each garment around hunting for the tag.
Low-cost options
-
Paper tags + safety pins or plastic barb fasteners — pennies per garment, works fine for a shop under roughly 200 pieces a day. The weakness is legibility; use a fine-tip permanent marker and print, don't scrawl.
-
Pre-printed sequential paper tags — order rolls with the order-number blank and fill in piece numbers by hand. Cheap, and the pre-printed sequence prevents duplicate order numbers.
-
Thermal barcode tags — higher upfront cost but near-zero mis-reads at assembly. If you've already moved toward scanning, barcoded tags are what make piece-count checks automatic rather than manual.
For a shop still on paper, option 2 hits the sweet spot: low cost, forces unique order numbers, and leaves room for the "3 of 5" notation that prevents the bundle problem.
Stage 3: Processing handoff
The handoff from counter to back is where garments quietly go off-ticket. The rule is simple and absolute: nothing moves to the processing rack without a tag already on it.
In practice: counter person tags all pieces → places them together on the intake hook under the order number → the back operator who pulls them confirms the piece count against the ticket before routing. That's two people counting the same order. If the counts disagree, the garment stops right there — not discovered missing at the end of the day.
Quick visual of the two-person handoff workflow.
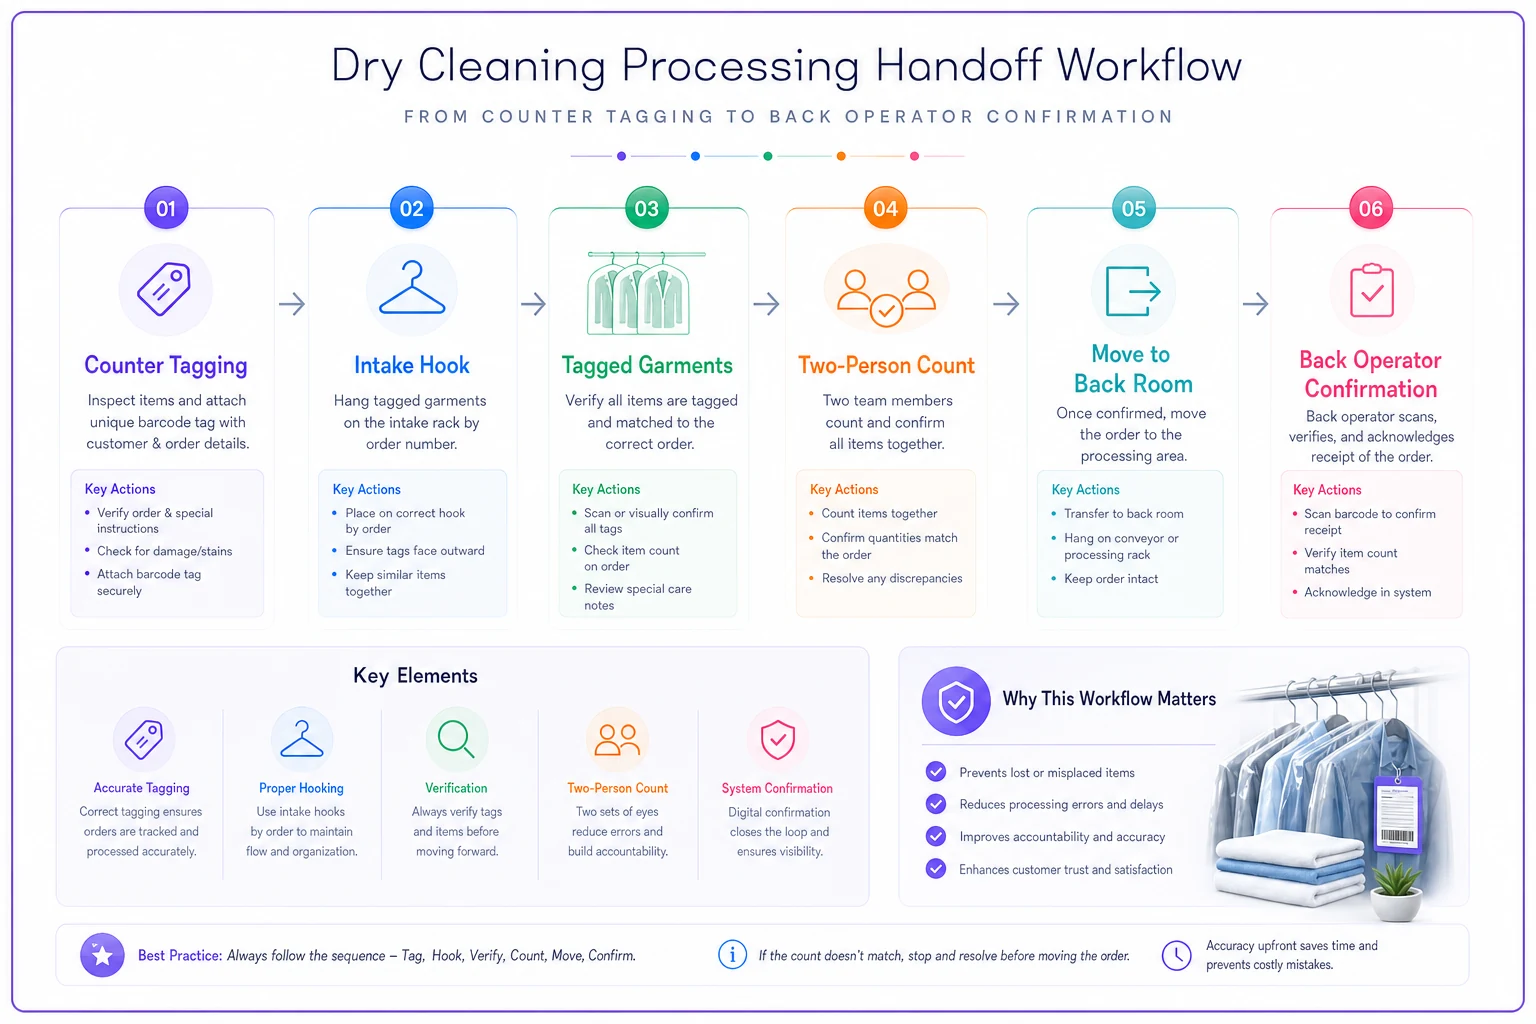
One pattern worth naming: the "temporary" holding spot. The coat on the counter, the dress draped over a chair "for just a minute." Every lost-garment story has one of these. The discipline is that there is no temporary spot. A garment is either in the customer's bag, on the tagged intake hook, or in processing. There is no fourth location.
Stage 4: Partial pickups — the SOP that prevents the worst disputes
Partial pickups are where single-location shops bleed. Customer comes in for "just the shirts" from a seven-piece order, takes four, and now your system has to remember that three pieces are still owed — and which three. Get this wrong and you either hand out the wrong remaining pieces later or lose track of what's still in the shop.
POS-based partial pickup
-
Pull the order and verify total pieces outstanding on screen before touching garments.
-
Mark only the picked-up line items as released — never close the whole order.
-
Confirm the remaining count out loud
"You're taking the four shirts, I've still got your two slacks and the blazer — three pieces staying with us, ready for pickup anytime."
-
Print a partial-pickup slip showing what was taken and what remains, stapled to the customer's original receipt.
-
Return the still-owed garments to the rack under the same original order number, not a new one.
Paper-based partial pickup
PARTIAL PICKUPS — Order #4821 -------------------------------------------- DATE TAKEN REMAINING INITIALS 10/16 3 shirts 2 left MR 10/18 1 blazer 1 left MR --------------------------------------------
Each partial pickup gets a dated row, initialed by whoever released it. The REMAINING column is the running truth. When it hits zero, the order is complete. This single column prevents the most common partial-pickup dispute — the customer insisting they already picked up something they didn't.
Storage convention for split orders
Garments left behind after a partial pickup go back to their normal rack slot by order number, but with one change: flag the physical bundle or hook. A brightly colored "SPLIT" clip or tag tells anyone at pickup that this order has a history on the back of the receipt and the piece count won't match the original total. Without that visual flag, the next person who serves that customer sees "5 pieces" on the original ticket, finds only 2 on the rack, and panics about a lost garment that was legitimately picked up last Tuesday.
Stage 5: Final claim signoff
The last check is the cheapest insurance you'll buy. Before any complete order leaves, the person at the counter counts the physical tags against the ticket's piece count — out loud, in front of the customer.
> "Alright — five pieces, tags one through five, all here. Three shirts, blazer, slacks. Want to check them over before you go?"
The micro-script signoff ritual, stage by stage
Intake signoff: > "Five pieces counted. Blazer stain noted. Receipt in hand. Order on the hook."
Processing pull signoff: > "Order 4821, counted five, matches ticket. Routing now."
Partial-pickup signoff: > "Three taken, two remain. Slip stapled. Split flag on. Back on rack under 4821."
Final signoff: > "Five tags, five pieces, ticket matches. Customer inspected. Released."
These aren't scripts to read to the customer — they're the staff's own confirmation that they completed the stage. Said quietly or run through mentally, they force the count to happen. The shops that lose the fewest garments are the ones where these four confirmations are automatic.
KPIs and reconciliation cadence
You can't manage lost garments without a number to watch. Keep it to a handful of metrics and a daily rhythm.
Track these:
-
Daily piece-count reconciliation pieces logged at intake vs. pieces accounted for (in process + picked up + on rack). Should net to zero.
-
Unmatched tags found garments discovered with tags that don't link to an open order. Target: zero; anything above zero is a real signal.
-
Orphan garments pieces found with no tag at all. The worst category — each one is a near-miss dispute.
-
Partial-pickup aging split orders with remaining pieces older than 14 days, flagged for a reminder call.
-
Claim rate lost/damaged disputes per 1,000 pieces processed. Watch the trend, not the single week.
Reconciliation cadence:
A quick daily end-of-shift count — pieces in, pieces out, pieces on rack — catches problems within hours instead of weeks. The person closing walks the "to-process" and "ready" racks and confirms every garment has a readable tag. Any orphan goes into a logged holding spot with the date found, so if a customer calls you can match it. A deeper weekly reconciliation walks every open order older than its ready date.
Privacy and consent blurb
> "We record order details, contact information, and may photograph garments to document their condition. This information is used only to process and return your order and to resolve any disputes. We retain records for [X] days. Ask us for our full policy."
Keep the retention window consistent with whatever you set for your photo records, so your intake condition evidence and your written records expire on the same clock.
A real scenario
A single-location shop processing roughly 180–220 pieces a day was running about four to six lost-or-disputed garment claims a month. Most traced back to two sources: bundled orders tagged as one unit, and partial pickups tracked only in someone's memory.
They changed two things. One tag per piece with "X of Y" numbering. And the partial-pickup table on the back of every receipt, initialed on each split. No new software — just the tag change and the receipt layout.
Within about two months, disputes dropped to roughly one a month, and most of those got resolved on the spot because the piece count and the partial-pickup history were right there on the receipt. The counter team also stopped dreading the "I dropped off three, not two" conversations, because the intake read-back meant the count was confirmed at drop-off. The owner's rough estimate was a few hundred dollars a month in avoided goodwill credits and replacement payouts — plus a lot less afternoon spent digging through racks.
When this level of process makes sense — and when it doesn't
It makes sense when you're regularly handling bundled orders, partial pickups, or any garment valued high enough that a single lost piece hurts. If your claim rate is creeping up or your team is spending real time hunting for garments, the full chain pays for itself fast.
It's probably overkill if you're a very low-volume operation running maybe a few dozen pieces a day with almost no partial pickups and a claim history of essentially zero. In that case, the intake read-back and one-tag-per-piece rule alone will carry you — the partial-pickup table and daily reconciliation are there if you grow into them.
Who should not bother with the barcode upgrade yet: shops that haven't first fixed the paper discipline. Scanning a mis-tagged garment just records the mistake faster. Get the count-and-confirm habits solid on paper first; the hardware only amplifies whatever process you already have.
Week 1 / 2 / 4 implementation checklist
Week 1 — fix intake and tagging:
-
- [ ] Print the new receipt layout with bold TOTAL PIECES and a partial-pickup line
-
- [ ] Switch to one tag per garment with "X of Y" numbering
-
- [ ] Post the intake script at the counter; have each person practice the read-back
-
- [ ] Set standard tag placement by garment type and post the chart
Week 2 — lock the handoff and partial pickups:
-
- [ ] Enforce the "no garment moves without a tag" rule at the processing hook
-
- [ ] Roll out the partial-pickup table and SPLIT flags
-
- [ ] Start the end-of-shift piece-count reconciliation
-
- [ ] Begin logging orphan garments with date found
Week 4 — measure and tighten:
-
- [ ] Review the first three weeks of claim rate, orphan count, and unmatched tags
-
- [ ] Add partial-pickup aging reminders for splits older than 14 days
-
- [ ] Post the privacy/consent notice and add the receipt line
-
- [ ] Decide whether barcode tags are worth it based on your orphan and claim numbers
Week 4 — measure and tighten:
Equipment and cost estimates
The expensive part of this isn't the equipment. It's the first two weeks of making the read-back and the piece-count confirmation automatic.
-
- Pre-printed sequential paper tags + fasteners roughly $30–$70 to start, pennies per garment ongoing
-
- Receipt stock / thermal paper for the new layout usually already in your budget; new template is free
-
- SPLIT clips or colored flags about $10–$20 for enough to cover active splits
-
- Fine-tip permanent markers negligible, but buy good ones — legibility is the whole point
-
- Optional later
thermal barcode printer + tags:
a larger step, only worth it once the paper discipline is proven and volume justifies it
The expensive part of this isn't the equipment. It's the first two weeks of making the read-back and the piece-count confirmation automatic. Once those become reflex, the lost-garment problem mostly solves itself — not because garments stopped being set down in the wrong place, but because every garment now passes through a point where someone has to confirm it exists before it moves.
The expensive part of this isn't the equipment. It's the first two weeks of making the read-back and the piece-count confirmation automatic. Once those become reflex, the lost-garment problem mostly solves itself — not because garments stopped being set down in the wrong place, but because every garment now passes through a point where someone has to confirm it exists before it moves.
Ready to elevate your dry cleaning operations?
Join hundreds of dry cleaners using Pressesly to save time, reduce errors, and enhance customer satisfaction.